A first look at the new Saturn and Mimas FPGA boards from Numato Labs
Even before the Elbert FPGA board (which I already had a chance to review)came out, Numato Labs worked on a FPGA board with a Spartan 6 on board (the Elbert board comes with a Spartan 3A). It was designed to contain an additional SDRAM module, but unfortunately the first version had some major issues. So I was rather delighted to some, nearly one year later, read the news that the board now got finished and is available. Even better, Numato Labs made two different versions: Mimas as a pure FPGA board, and Saturn as the larger one with additional SDRAM (512MBit DDR RAM).
Tom was, again, so kind to send me over one of each board. So I got a late christmas present (only by a week, and that even just because our local Fedex office closed down on the days between Christmas and New Years Eve). Thanks again!
So on the 2nd of January I got a package dropped on my desk, containing just two small boards. Even though they pack more punch than the Elbert board, they are a little bit smaller:
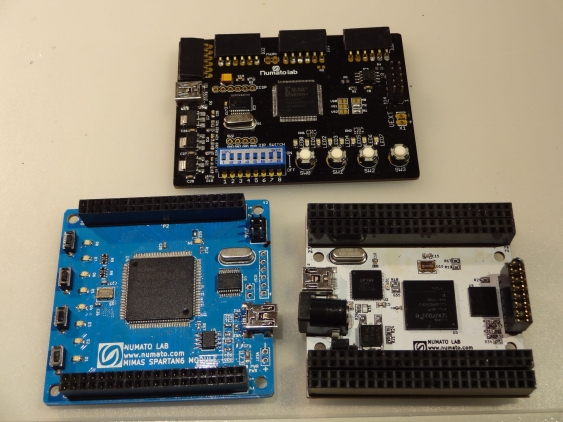
On the top is Elbert, Mimas is to the left and Saturn to the right. Mimas looks less crowded, this is due to the less space-intensive headers (when compared to Elbert). For Saturn on the other hand, the insane amount of GPIOs leave much less room for all of the components. The build quality looks good, and the Saturn with its white solder mask looks really nice. On the Mimas board, the fourth button is just labeled as ‘SW’ (instead of ‘SW4’ - on the schematic it is correct, so I might have an earlier revision). The boards are populated on top and bottom, so it might be sensible to add some standoffs to relieve the bottom components (or some rubber feet).
Whats in the package?
Both boards come with an on-board M25P16 flash memory for storing the FPGA configuration data. Where the Mimas board uses a PIC microcontroller for communication with the PC, the Saturn board uses a FT2232H (whose second channel is available to get, for example, a serial port connection to the FPGA). There are configuration download utilities for both boards, which can be used to store the generated bit-stream file in the flash memory. Since these programs are for Windows only, there are JTAG headers available which can be used with an supported Xilinx JTAG cable (e.g. an USB cable, or the DLC5 parallel cable I build a while ago).
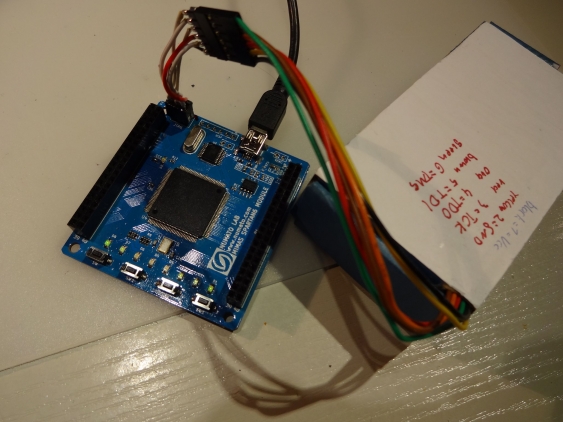
Here comes my first issue with these boards: one needs a cable adapter for both of them. Mimas uses a 2x3-pin JTAG header, and Saturn a 2x7-pin header. The latter one looks like the standard Xilinx JTAG connector, but TDI and TDO are swapped. And my cable has a 6-pin header in a single row, so I need an adapter for Mimas too. It would have been nice to have the same connector on both (and it would have saved space on Saturn, too). (Additional note: in recent revisions of Saturn TDI and TDO seem to be in the correct position, at least the manual shows it that way).
Also, when connecting the JTAG cable, be careful with its placement. On Mimas pin 1 is on the edge of the board, whereas on Saturn its vice versa. And to make matters worse, the Saturn manual indicates, when showing the JTAG pin-out, that pin 1 is on the board edge too. I did not check properly (the board overview showed the pin correctly), and accidentally shorted all JTAG pins to 3.3V. Fortunately the Spartan chip seems rather robust… So look at the user guides, and then mark pin 1 on your board.
Getting them to run
Having overcome these hassles, I started playing around with both boards. To me it seems Mimas is intended more for startes. Its on-board switches and LEDs make initial experiments much more simple. There is already a nice demo design uploaded (simple running lights whose speed can be varied by the buttons). Unfortunately I was not able to find the sources for it, this would have been a good example for starting work.
Saturn in contrast comes without any such peripherals, but instead provides access to nearly all GPIOs available on he Spartan (the headers amount to 192 pins). In addition with the onboard DDR-sRAM this makes clear that its intended for power users needing even more power. For these the Saturn board can be ordered with larger Spartan 6 version, up to the LX45 (Mimas is only available with the LX9).
So I created a simple demo design, just using the incoming clock signal (there is a 100 MHz CMOS oscillator on board) and two 16 bit counters (to form a 32 bit counter). I then routed the bit 26 up to 29 to outputs, which results in a 4 bit counter clocked at about 1.5 Hz. On the Mimas board the outputs are assigned to the pins with LEDs on them. On the Saturn, I assigned them to pins directly beneath ground pins (so I can place LEDs directly into the headers). While doing so I saw that the header assignment table in the Saturn manual got mixed up, but the schematics are correct (P6+7 got swapped with P8+9 in the table). When compiling the design, I got a warning in the supplied user constraints file. To get rid of that, add a line ‘NET “CLK” TNM_NET = CLK;’ to the UCF file (right after defining the clock input).
While finding out why my JTAG cable adapter didn’t work (in addition to the header pin-out difference above it seems that one of the pins has a cold solder joint) I tested the uploading tool (needed to run Windows in VirtualBox for that). Besides being rather slow in the VM it worked without problems. After getting the cable problems sorted out, I went with a direct JTAG upload using Xilinx iMPACT. For that I followed the steps outlined in the manual, which are detailed and clear (and they worked right from the start). (Generally speaking, all the manuals from Numato I have looked on so far are really nice and explain everything one needs for starting to work)
But since this is a three-step process (after building the design the bit-stream file needs to be created, then the PROM file from that which can finally then uploaded to the FLASH memory) it looks like I should look into the scripting capabilities of the Xilinx tool suite.
Conclusion, and what to do with them
So, whats the final verdict? I like these boards. Though there are some initial hurdles, one needs to overcome them only once. And after that, you get two really nice and powerful FPGA boards, for quite a good price. They don’t pack unnecessary stuff with them, but instead give the most flexibility. For someone starting with FPGA design, who has outgrown the Elbert board (or wants to get his hands on more complex stuff) I would recommend the Mimas board, since the on-board LEDS and push buttons make the first designs simpler (and the LEDs can aid in debugging by attaching them to interesting signals). For the power user the Saturn board is clearly the way to go. Having the large RAM on board and being available up to the LX45 FPGA makes it an interesting target for rather large designs. And it also gives you a really huge amount of GPIOs.
I for myself have no immediate project where I would need them. There is still the AMC1203 waiting to be worked on, so I might take a shot on that again. Having enough outputs means I could go for the seven-segment display this time. But I might also look into the PicoBlaze embedded MCU. it might make driving the LCD even easier… Another idea might be to migrate the Open Logic Sniffer logic analyzer over to the Spartan6. Having a logic analyzer around is always a good idea :)

